WordPress is ranked number 1 among famous CMS. Next is the location of Joomla. Installing WordPress, learning and even coding here (plugin development) is much easier than other CMSs. Moreover, WordPress is lightweight. Even if you don’t know programming, you can make a complete website with it. WordPress is primarily used to create blogs, but nowadays there are many WordPress plugins that can be used to create eCommerce sites, forums, etc.
WebcoachBD will first have a tutorial on creating a site (blog) and management with WordPress. Then there are plenty of resources on WordPress theme development. CMS must be downloaded before working with WordPress. It is an open source project so it is free to download and use

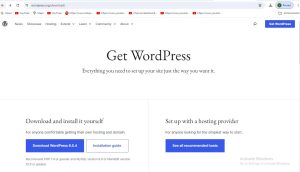
Download the latest version from here. Currently (Dec’14) WordPress is running on version 4.0.1. We will also show all tutorials using this version on WebCoachBD.
** If you create a site with WordPress, by default login, signup, add new menu/page, display the last added article, etc., many tasks can be done from the admin panel. Even if you need something that isn’t in WordPress by default, WordPress has thousands of free plugins to explore.

** If you are non-technical you can still create your own site with WordPress (admin panel only). But if PHP (and HTML, CSS) is well known then you can do theme development. As a result, you can create your own site outlook.
A blog is created as soon as WordPress is installed. And it is very easy to install.
- htdocs and create a directory/folder named “tutorial” on your server (localhost/development server) and extract the downloaded WordPress zip (latest.zip) there. You will find an extracted folder named “wordpress”. Enter this folder and cut everything and paste it in “tutorial”. Basically everything was in localhost/tutorial/wordpress and now it’s in real localhost/tutorial, nothing else. Inside the “tutorial” directory you will find the contents as shown in the image below (click image to enlarge
- Now create a database. Suppose I gave the name tut_db, if you don’t know how to create a database, come and see this tutorial.
- Now go to the “tutorial” directory and rename the wp-config-sample.php file to wp-config.php. Or if you want, create a file called wp-config.php without renaming it and paste all the contents of wp-config-sample.php there. Open this file and enter “DB_NAME”, “DB_USER” and “DB_PASSWORD” (line 19,22,25) respectively for database name (tut_db), database user name (root) and database password (all database passwords are empty on localhost i.e. Give it.
- Now type http://localhost/tutorial in the browser and the installation will start. First of all, a long list of languages will appear as an option in which language to create the site, here a form will appear if you select “English” and click on the “Next” button. Fill the form as below (you can give your desired information) and click on “Install WordPress” button.
From the admin panel (http://localhost/tutorial/wp-admin) clicking on the “Posts” link above from the left side menus will bring up the list of all posts, along with all the submenus under the “Posts” menu.
Clicking the submenu “All Posts” will show the list of all posts, actually “Posts” and “All Posts” have the same link.
If you click on the next submenu “Add New”, the new post creation form will appear as below, the form will be published by clicking on the “Publish” button on the right with the title, content etc.
new_post
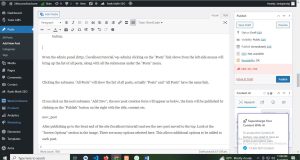
After publishing go to the front end of the site (localhost/tutorial) and see the new post moved to the top. Look at the “Screen Options” section in the image. There are many options selected here. This allows additional options to be added to each post.
If the Format option is selected, there will be a post formatting list on the right. Here by default “Standard” is selected. There are also “Aside”, “Image”, “Video” etc. Whichever you select, the post will appear accordingly.
After selecting “Categories”, the “Categories” section will appear below Format, all the categories you have created will be shown here. We haven’t created any categories yet so by default a category called “Uncategorized” is showing and by default all posts will be saved in this category.
You can create a new category here by clicking on the “Add New Category” link.
Next is “Tags” and with it selected you will see a text box called “Tags” under “Categories”. From here you can enter some related tags or keywords for the post. If you want to enter multiple words, write them one by one and click on “Add” button. For example if your post is about PHP then you can tag “PHP”, “Programming”, “Tutorial” etc. It is optional. Post will be saved/published even if tag is not given.
Clicking on the “Choose from the most used tags” link will show the list of most used tags (if you have created tags while creating the post earlier) from which tags can be selected.
The next option is called “Featured Image”, by default it is selected and you can select an image for this post from the “Set featured image” link in the “FeaturedImage” section at the bottom right (from the window that will appear to browse the image). will be). This image will appear at the beginning of the post. Of course, if you want, you can show it anywhere in the post. I will discuss how this is possible later, during theme development.
After selecting the “Excerpt” option, the RKT textarea will appear below the content textarea. Here you can provide a summary or some description of the post, this is also optional. Any description can be arranged to display later on the post. Later during theme development I will show how to display the excerpt.
Then tick “Send trackbacks” and a text box will appear under “Excerpt”. It is actually used for notifications. If this blog is connected with any other blog then give the address (URL) of that blog in the text box.
Then “Custom Fields” is a very useful option, if ticked, the text box for adding custom fields will appear under “Send trackbacks”. One or more fields can be added
Here, in place of name, give any custom field name and value in value. A custom field can be added by clicking the “Add Custom Field” button, you can add multiple fields if you want. Let’s say you’re writing a post where 5 other people have contributed, and you want to name them too. In that case you can add those names here and show them in the post. There are functions for that and I will show them during theme development.
After selecting the “Discussion” option, two things will be enabled and disabled. If “Allow comments” is ticked, the user can comment on the post. b is enabled by default. If you want to stop commenting on the post, you have to uncheck it. And if “Allow trackbacks and pingbacks on this page” is checked, pingbacks and trackbacks can be made on this post. This post can be linked to other blog posts through pingbacks and trackbacks and notifications can be exchanged.
If “Slug” is ticked, a textbox will appear, here you can decide how the URL will be when you go to that post. If you don’t give then by default the title of the post will be formatted by WordPress itself. You can provide your own slug if you want. For example, when we go to our first post, the browser will show the URL http://localhost/tutorial/webcoachbd-starting-new-stuff/ like this, but if I enter “test-post” in the textbox of the slug, the URL will be http://localhost /tutorial/test-post/ (You have to change the Permalinks from the Settings menu to see the URL of the post like this. I will show the details later)
Then “Author” is ticked by default. Here the list of all authors will show in dropdown if multiple authors are created (new author can be created from Users menu).
Then the “Screen Layout” radio button has 2 checked by default so the form is displayed in two columns, select 1 to display all in one column.